Documentation

Installation

💡

Information

To successfully complete this installation guide, you must have administrator rights in the Microsoft 365 Admin Center. The application requires elevated permissions that can only be granted by an administrator. The following section explains how to install Attachment Flow through the Microsoft 365 Admin Center.

1. Open Microsoft 365 Admin Center

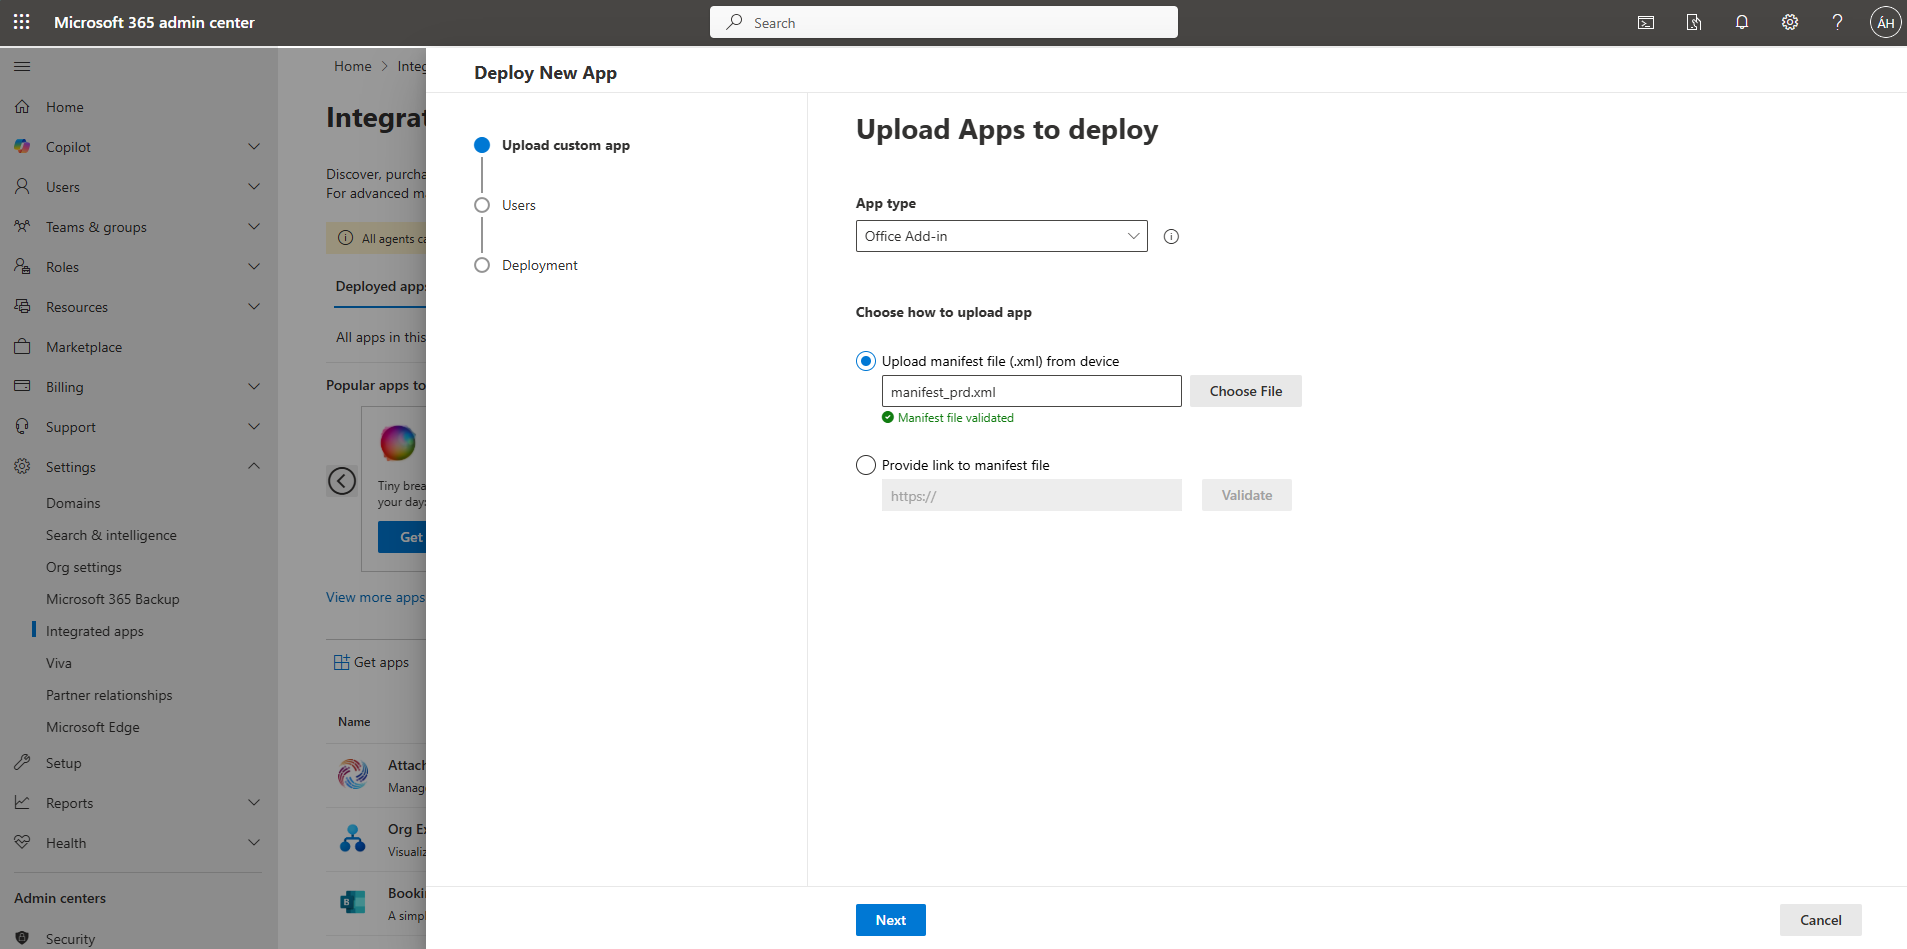
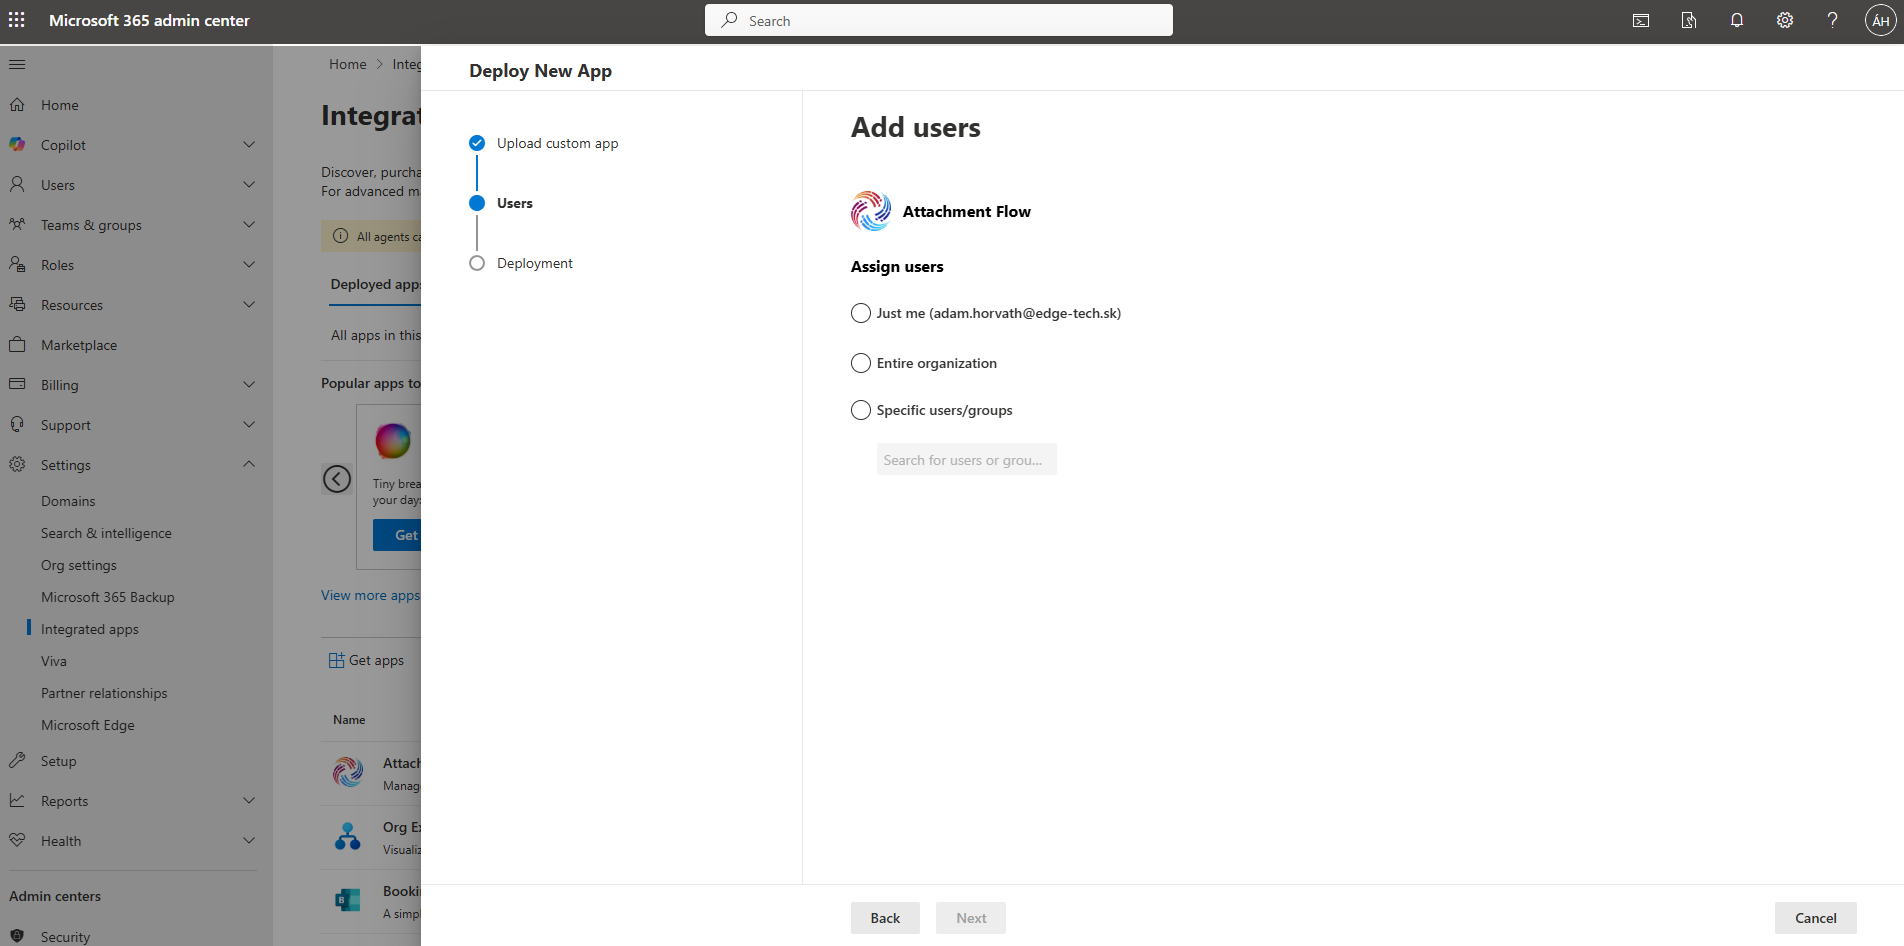
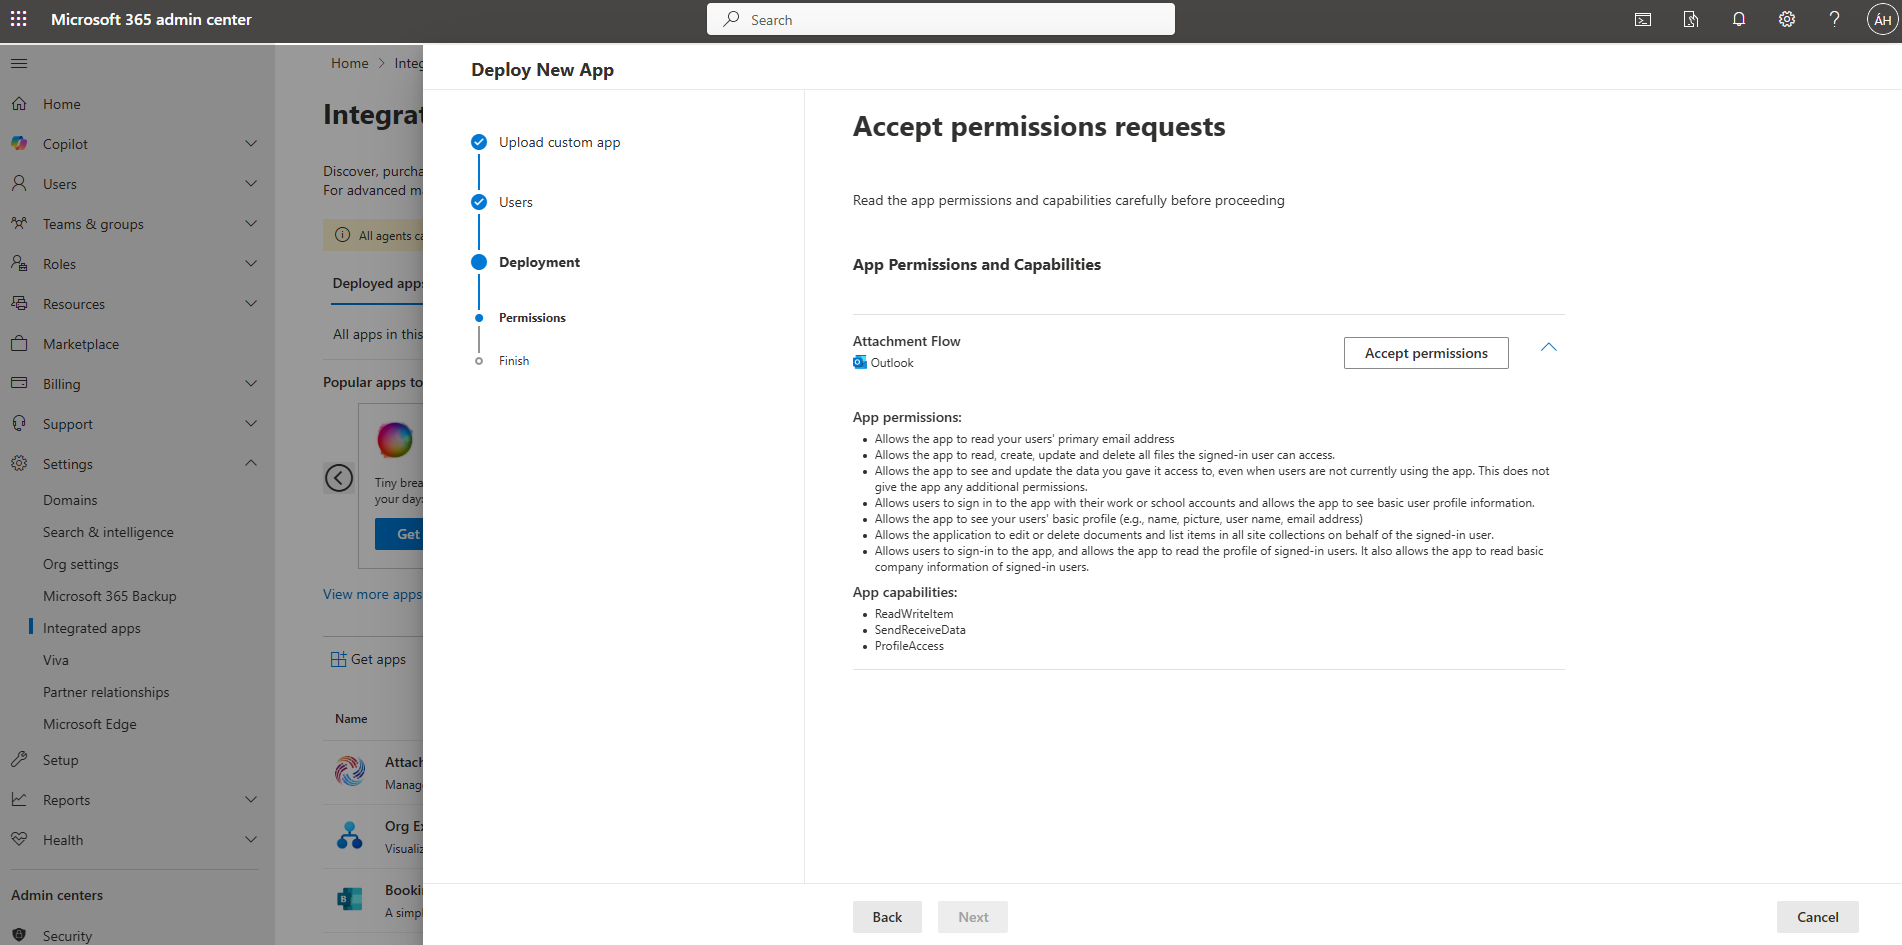
To begin the setup, open the Microsoft 365 Admin Center at admin.microsoft.com. Log in using your Microsoft 365 administrator account.

This ensures you have the required permissions to deploy the Attachment Flow Outlook add-in for your organization.

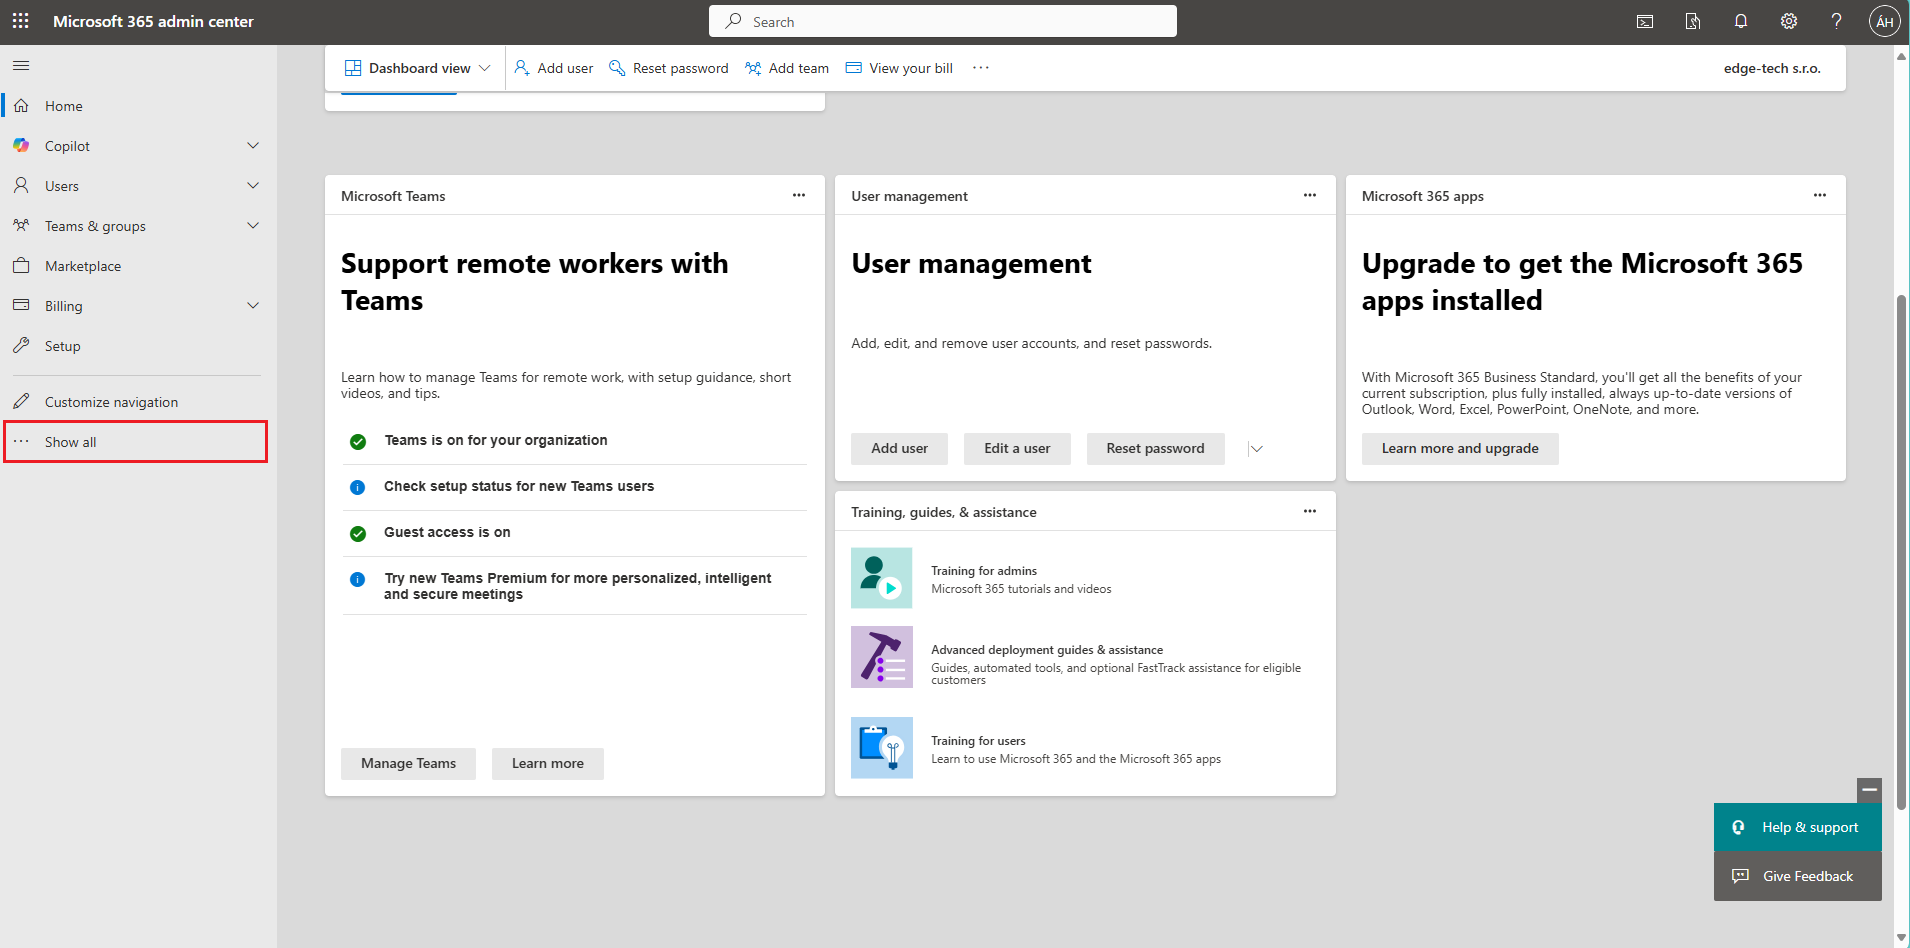
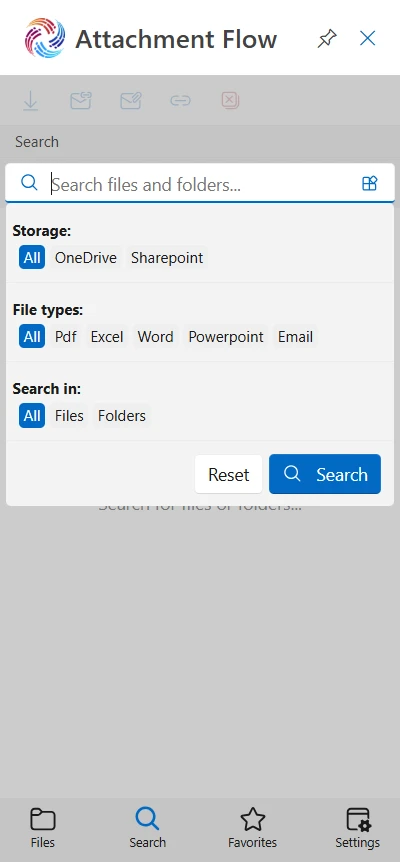
Click the Show all to reveal all the options.

Microsoft 365 Admin Center screenshot

2. Go to Integrated Applications

In the Microsoft 365 Admin Center, click Settings in the left-hand menu, then select Integrated applications.

This section allows you to manage and deploy third-party apps and add-ins, including Attachment Flow.

After opening Integrated applications, click on Upload custom apps. This is where you can start the installation process for the Attachment Flow add-in.

Integrated Applications in Microsoft 365 Admin Center

3. Upload the Manifest File

💡

Manifest file

Since this is a pre-release version of Attachment Flow, you will need to request the manifest file via email at adam.horvath@edge-tech.sk before proceeding.

In the Custom apps section, select the Application type as Office Add-in.

Then choose Upload manifest file (.xml) from device and select the manifest file you received.

Once the manifest is validated, click Next to proceed with the deployment.

Upload Manifest File in Microsoft 365 Admin Center

4. Select Users for Installation

After uploading and validating the manifest, you need to choose who will have the Attachment Flow add-in installed:

  • Just me: Only your account will have access to the add-in.
  • Entire organization: The add-in will be available for all users in your Microsoft 365 tenant.
  • Specific users/groups: Choose individual users or security groups who should have access.

After selection the appropriate options, click next.

Note: This setting can be changed at any time after installation, allowing you to expand or restrict access as needed.

Select users for Attachment Flow installation

5. Review Permissions

In the permissions popup, you can review the permissions requested by Attachment Flow.

You will also see the publisher information in the popup. edge-tech s. r. o. is a verified publisher of Attachment Flow, which is indicated by a blue badge next to the publisher name. This ensures the add-in is safe and trusted.

After reviewing the permissions and confirming the publisher, click Accept. You will then be prompted to log in using your administrator account to give consent for the add-in.

Review permissions and verified publisher for Attachment Flow add-in Accept permissions and verified publisher for Attachment Flow add-in

6. Finish Installation

After reviewing permissions and giving consent, click Finish Installation to complete the setup of Attachment Flow.

💡

Important

The add-in may not appear immediately after installation. It can take up to 72 hours for the add-in to become visible in Outlook. Users may need to relaunch Outlook or log in again to Outlook Web App (OWA) for the add-in to appear.

Finish installation of Attachment Flow add-in

Sign In

Sign In to Attachment Flow

Attachment Flow login screen

To get started, sign in securely with your Microsoft 365 account. This step connects Attachment Flow to your Outlook environment using your existing organization credentials.

Steps:

  • Click Sign in with Microsoft.
  • You’ll be signed in automatically through your Microsoft 365 account — no additional prompts or permissions are required.
  • After signing in, you’ll be redirected to the main dashboard where you can begin managing your attachments. If this is your first time logging in, a short onboarding sequence will run to help you set up basic preferences and see key features.

Note
Attachment Flow uses your organization’s Microsoft 365 authentication, ensuring a secure, seamless login without additional approval dialogs.

Onboarding

1. First-Time Setup (Onboarding)

Attachment Flow onboarding feature overview

When you sign in for the first time, Attachment Flow will guide you through a quick onboarding process. This takes less than a minute and helps personalize your workspace in Outlook.

Welcome Overview
This screen introduces the main benefits of using Attachment Flow:

  • Seamless integration with Outlook, OneDrive, and SharePoint.
  • Attach files or links directly to your emails.
  • Manage and organize documents without leaving Outlook.
  • ⏱Save time by reducing steps in file sharing.
  • Keep everything in sync with the storages you already use.

Click Next to continue setup.

2. Select Sharepoint Sites

Attachment Flow select Sharepoint site Attachment Flow select Sharepoint site Attachment Flow select Sharepoint site

Attachment Flow connects only to the SharePoint sites you choose. This keeps your workspace simple, focused, and relevant to your daily work.

Steps

  • Use the search box to find SharePoint sites in your organization.
  • Click the Add button to add site to your workspace.
  • You can remove any site later using the Remove button.
  • Once you’ve selected the sites you want, click Next.

💡

Information

Only the selected sites will appear in Attachment Flow when browsing or saving attachments. You can update this selection anytime in Settings.

Tip
If no results appear, try adjusting your search term — the list shows only SharePoint sites you have access to.

File & Folder List

1. Overview

Attachment Flow file/folder list

The main screen is where you’ll spend most of your time in Attachment Flow. From here, you can browse your SharePoint or OneDrive files, organize folders, and manage attachments directly inside Outlook — all without leaving your email window.

To help you navigate easily, the interface is divided into several key sections:

  • Main Menu – access core features and settings.
  • Breadcrumb Navigation – shows your current folder path and lets you move quickly between levels.
  • File & Folder List – browse, preview, and manage your files.
  • Action Button (➕) – opens a quick menu for adding or uploading files, creating folders, or starting key actions.
  • Bottom Tab Menu – switch between views or modules such as recent files, favorites, or settings.

Each section works together to give you a clean, familiar experience similar to Microsoft 365, optimized for attachment management.

2. Main Menu

Attachment Flow Main Menu

The main menu lets you perform actions on the selected file or files. To select a file, click its row in the list. To select multiple files, hold Ctrl while clicking each file.

Menu options:

  • OneDrive icon – Storage selector. Choose between OneDrive and SharePoint. Files from the selected storage appear in the list.
  • Download – Download the selected files to your local computer.
  • Attach as links – Attach the selected files as secure links to the email currently in compose mode. If no email is open, a new draft will be created with the links inserted into the body.
  • Copy links – Generate shareable links for the selected files and copy them to your clipboard. You can paste these links anywhere, such as in Teams or chat.
  • Clear selection – Deselect all currently selected files.

3. Breadcrumb

Attachment Flow Breadcrumb

The breadcrumb bar, located below the main menu, shows your current location within the selected storage (OneDrive or SharePoint). It helps you keep track of where you are and easily move between folder levels.

4. File Row

Attachment Flow File Row In The List

The file and folder list displays all items from your selected SharePoint or OneDrive location. Each row represents one file or folder, providing quick access to common actions.

File Row Elements

  • File icon – Indicates the file type (e.g., .pdf, .docx, .xlsx).
  • File name
  • Last updated – Shows the date when the file was last modified.
  • File size – Displayed on the right side of the row.

Action Icons
To the right of each file name, you’ll find a set of quick-action icons:

  • Rename – Edit the file name directly.
  • Download – Download the file to your local computer.
  • Share menu – Opens a submenu with sharing options:
    • Copy link – Generate a shareable link and copy it to your clipboard. You can paste it into Teams, chat, or any message.
    • Email link – Attach the selected file as a link to the currently edited Outlook email.
    • Email file – Attach the selected file as a standard file attachment to the currently edited Outlook email.
  • More options – Opens a menu with additional actions:
    • Open in browser – Opens the file directly in SharePoint or OneDrive.
    • Delete – Removes the file from storage.

💡

Tip

  • Click a row to select a file.
  • Hold Ctrl to select multiple files for batch operations.

5. Action Button

Attachment Flow Action Button Attachment Flow Action Menu

The Action Button in the lower corner of the file list provides quick access to key operations you’ll use frequently. Clicking the ➕ icon opens a compact menu with three available actions:

  • Refresh – Reloads the current folder to display any newly added, renamed, or deleted files.
  • New folder – Creates a new folder inside the currently open directory. After selecting this option, enter a name for the folder and press Enter to confirm.
  • Save email – Saves the currently open Outlook email (including attachments) directly into the selected folder in SharePoint or OneDrive.

6. Bottom Navigation

Attachment Flow Navigation Menu

Options

  • Files – Displays your SharePoint or OneDrive files and folders. This is the default view after signing in.
  • Search – Search across your connected storages to quickly locate files or folders. You can search by file name or keyword.
  • Favorites – Shows folders you’ve marked as favorites for faster access. Use this view to keep important folders within reach.
  • Settings – Manage your preferences, connected SharePoint sites, and account options.

Save Email & Attachments

Save Email Dialog

Attachment Flow Save Email & Attachment Dialog

The Save Email dialog appears when you choose to save an Outlook email and its attachments into a SharePoint or OneDrive folder. This dialog lets you review, rename, and confirm which items will be uploaded.

How it works

  • Upload to – Shows the destination folder where the email and its attachments will be saved. You can verify the folder path before uploading.
  • Item list – Displays all items that will be uploaded:
    • Email item – Represents the selected Outlook email.
    • File items – Represent attachments included in the email.
  • Rename option – Click the edit icon next to any item to rename it before uploading.
  • This allows you to apply meaningful names or follow your company’s naming conventions.

Actions

  • Upload – Begins saving the email and selected attachments into the target folder.
  • Cancel – Closes the dialog without uploading any files.

Favorites

Overview

Attachment Flow Favorites

The Favorites tab gives you quick access to folders you use most often. It’s a personalized space where you can keep important items visible at all times, regardless of which storage they come from.

How it works

  • You can mark any folder as a favorite by clicking the ⭐ star icon next to its name in the Files & Folder or Search page.
  • Once marked, the item appears automatically in the Favorites list.
  • Favorites can come from both OneDrive and SharePoint.

Available actions
Each favorite item supports the same quick actions as in the File & Folder list:

  • Rename – Edit the file or folder name.
  • Download – Download the item to your local computer.
  • Remove from favorites – Click the filled star icon to remove it from your favorites list.
  • More options – Access additional actions such as Open in browser or Delete.
💡

Tip

Favorites are stored per user, so each person sees their own customized list. Use this page to keep track of frequently accessed project folders, templates, or key documents.

Settings

Overview

Attachment Flow Settings

Application Settings

  • Open folder after creation
    When enabled, Attachment Flow automatically navigates into a newly created folder after it’s made. Turn this option off if you prefer to stay in the current folder after creating new directories.
  • Manage your SharePoint sites
    Opens the site management window, where you can add or remove SharePoint sites available in Attachment Flow. Only the selected sites will appear in your file list and search results. You can update this selection anytime without affecting your stored files.

Support

For further assistance, email adam.horvath@edge-tech.sk or visit our homepage.